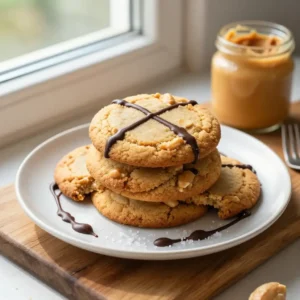
The Cookie That Whispers Your Name
There’s a certain magic that happens when you open a jar of peanut butter. That rich, nutty aroma hits you first—a warm, earthy scent that instantly transports you back to childhood kitchens and after-school snacks. Now, imagine that scent amplified, baked into a golden cookie that’s crispy around the edges, delightfully chewy in the center, and crowned with the iconic fork-cross pattern. That’s the moment you know you’re about to experience pure, unadulterated joy. The first bite is a crunch that gives way to a soft, melt-in-your-mouth texture, all swimming in a sea of salty-sweet peanut butter bliss. This isn’t just a cookie; it’s a warm hug in edible form.

The Unbeatable Allure of a Simple Cookie
Why do these particular cookies have such a cult following? It’s not about fancy ingredients or complicated techniques. It’s about perfection in simplicity. This recipe requires no electric mixer, no chilling time that tests your patience, and no exotic ingredients you have to hunt down. You probably have everything you need in your pantry right now. The beauty lies in its reliability. Every single time, you get that perfect balance of textures and that deep, roasted peanut flavor that feels both nostalgic and exciting. It’s the cookie you can whip up on a whim for a sudden craving, or bake in a batch for a last-minute gathering. They are the undisputed champion of the “I need a cookie, and I need it now” scenario.
The Peanut Butter Secret: It’s All in the Jar
Let’s talk about the star of the show. Peanut butter isn’t just a spread; it’s a complex ingredient with a personality. The type you choose can dramatically alter your cookie’s destiny. For the classic, sturdy-yet-tender cookie we all know and love, a good old-fashioned, **commercial creamy peanut butter** is your best friend. Why? Its stabilized oils and consistent texture create a cookie that spreads just the right amount and bakes up evenly. Natural peanut butters, with their oil separation, can lead to a crumblier, greasier result unless you meticulously mix and measure. The salt in most commercial brands is also a built-in flavor enhancer, eliminating the need for extra salt in the recipe. It’s the secret weapon that ensures your cookies have that signature rich, round flavor without any fuss.
What You Need to Raid From the Pantry
Gathering your ingredients is the easiest part of this entire adventure. No special equipment, no last-minute store runs.
* **Creamy Peanut Butter:** The foundation of our flavor. Smooth and well-stirred.
* **Granulated Sugar:** For sweetness and that classic crisp edge.
* **Brown Sugar:** Packed with molasses, it brings moisture and a deeper, caramel-like flavor.
* **One Large Egg:** The binder that holds our delicious universe together.
* **All-Purpose Flour:** The structure that gives the cookie its body.
* **Baking Soda:** Our leavening agent for a slight lift and perfect texture.
* **A Pinch of Salt:** To make all the other flavors pop.

Let’s Get Cooking: The Step-by-Step
This is where the transformation begins. Preheat your oven to 375°F (190°C) and line your baking sheets with parchment paper. In a large bowl, combine the creamy peanut butter, granulated sugar, brown sugar, and egg. Mix with a sturdy wooden spoon or spatula until it’s smooth and homogenous. There’s something deeply satisfying about watching those sugars dissolve into the peanut buttery goodness.
Now, sprinkle in the flour, baking soda, and salt. Stir until just combined. Don’t overmix! You want a soft, slightly sticky dough. If it feels too wet, a tablespoon more flour won’t hurt. Now for the fun part: roll the dough into 1-inch balls. Place them about 2 inches apart on your prepared baking sheets. Take a fork, dip it in a little granulated sugar (to prevent sticking), and gently press down on each ball to create that iconic crisscross pattern. This isn’t just for looks—it helps the cookies bake evenly.
Bake for 9 to 11 minutes, or until the edges are set and lightly golden. The centers will look a little soft, but they’ll firm up as they cool. This is the most crucial moment of patience. Let them rest on the baking sheet for 5 minutes before transferring to a wire rack to cool completely. The smell in your kitchen at this point is pure, unadulterated heaven.
Common Pitfalls: How NOT to Mess Up Your Masterpiece
Even the simplest recipes have their little quirks. Let’s avoid the common slip-ups that can turn your cookie dream into a crumbly nightmare.
The Over-Mixing Menace
When you add the flour, mix until it just disappears. Overworking the dough develops gluten, which can make your cookies tough and dense instead of tender and chewy. A few stray streaks are perfectly fine.
The Fork-Fail Fiasco
If you skip dipping your fork in sugar, it will stick to the dough and tear a messy hole instead of creating a clean pattern. This simple trick is the difference between a pro-looking cookie and a amateur hour disaster.
The Impatience Imperative
Taking the cookies off the baking sheet too soon is a recipe for crumbles. Those five minutes of resting on the hot sheet are non-negotiable. They allow the cookies to set up properly, so they hold their beautiful shape.
Serving Vibes: Setting the Scene
These cookies are mood-lifters. They are the perfect companion for a rainy afternoon spent with a good book and a steaming mug of coffee or tea. The steam from your drink mingles with the warm, nutty scent of the cookies, creating a cozy sanctuary. They’re also the star of any party spread, stacking high on a cake stand, their crisscross patterns looking like a fleet of tiny, edible smiley faces. Pack them in a lunchbox for a surprise treat, or crumble them over a bowl of vanilla ice cream for an instant, decadent dessert. The versatility of this cookie is what makes it a timeless classic. Looking for more inspiration on what to pair with your cookies? Check out these creative ideas for **smoothies and drinks** over at Indixer.
Frequently Asked Questions: Your Peanut Butter Cookie Queries, Answered
How can I ensure my Peanut Butter Cookies with Fork Cross Pattern stay chewy?
The key is under-baking them slightly and storing them properly. Pull them from the oven when the edges are set but the centers still look a tad soft. Once completely cooled, store them in an airtight container with a slice of bread. The bread releases moisture, which the cookies will absorb, keeping them soft and chewy for days.
How to freeze Peanut Butter Cookies with Fork Cross Pattern?
Freezing is a fantastic make-ahead strategy. You can freeze the baked cookies or the dough balls. For baked cookies, let them cool completely, then layer them between parchment paper in an airtight container or freezer bag. They’ll keep for up to 3 months. For unbaked dough, roll into balls, place them on a baking sheet to freeze solid, then transfer to a freezer bag. You can bake them directly from frozen, just add 1-2 minutes to the baking time.
What are the calories in Peanut Butter Cookies with Fork Cross Pattern?
While it varies based on the exact size and ingredients, a typical cookie from this recipe lands in the 120-150 calorie range. They are a satisfying treat, so one or two can really hit the spot without derailing your day. Remember, life is about balance, and these cookies are a delicious part of that equation.
Can I use crunchy peanut butter instead of creamy?
Absolutely! If you love a little extra texture in your cookies, crunchy peanut butter is a fantastic substitute. The peanut pieces will add a delightful crunch to every bite. Just make sure it’s well-stirred before measuring.
Why did my cookies spread too much?
This usually happens if your dough was too warm or if you used a natural peanut butter with a lot of oil. If your dough feels greasy, try chilling it for 20-30 minutes before scooping and baking. This will help the cookies hold their shape and maintain that perfect cross pattern.
Your New Go-To Cookie Awaits
There you have it. The path to peanut butter cookie nirvana is paved with simple ingredients and a little bit of love. This recipe for Peanut Butter Cookies with Fork Cross Pattern is more than just a set of instructions; it’s an invitation to create a little bit of magic in your own kitchen. So, preheat that oven, grab your favorite jar of peanut butter, and get ready to fill your home with an aroma that promises pure, simple happiness. Happy baking
Peanut Butter Cookies with Fork Cross Pattern
Ingredients
Ingredients
- 1 cup creamy peanut butter room temperature
- 1 cup granulated sugar
- 1 large egg room temperature
- 1 tsp vanilla extract
- 1 cup all-purpose flour
- 0.5 tsp baking powder
- 0.25 tsp salt