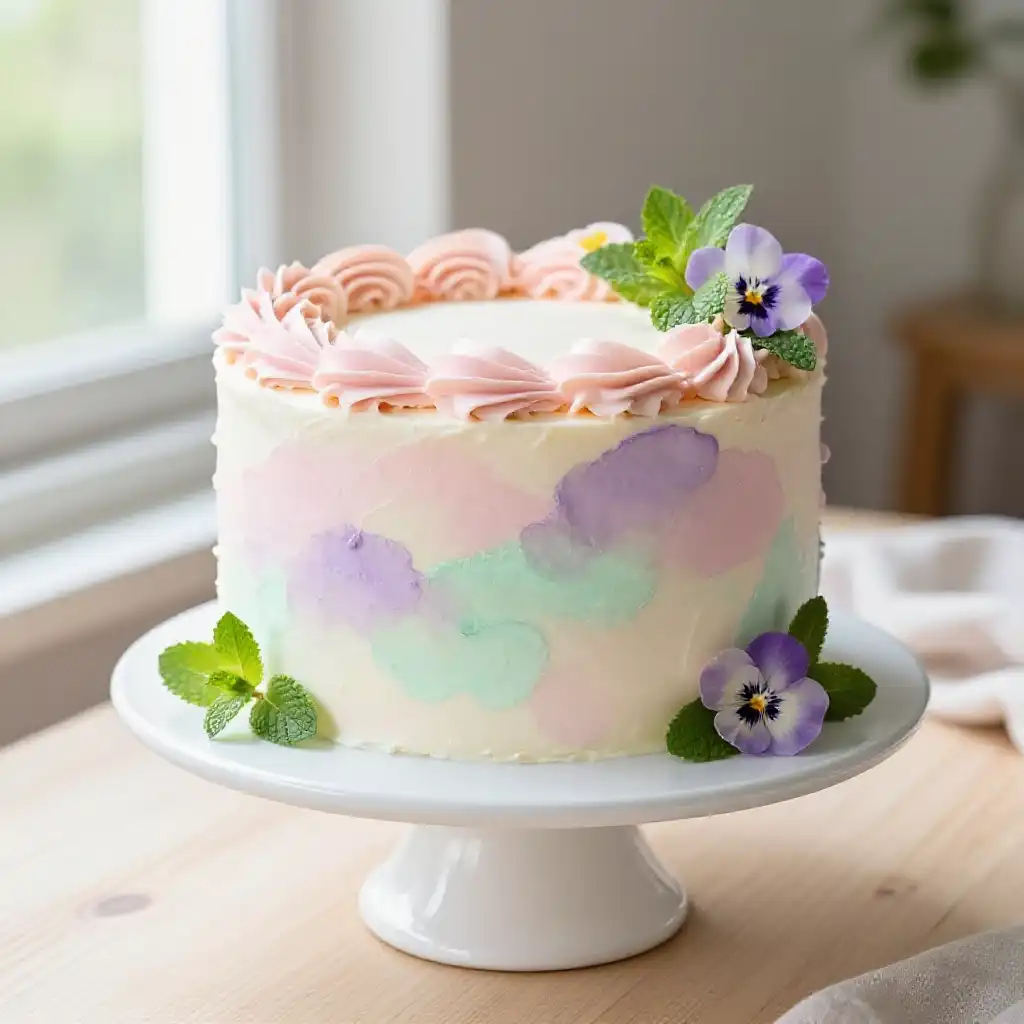
The Cake That Looks Like a Dream You Can Eat
There’s a moment, right before the first slice, when this cake just *stares* back at you. It’s not just a dessert; it’s a mood. I remember the first time I pulled one from the oven, the kitchen smelling like warm vanilla and sweet memories. The frosting wasn’t just white; it was a canvas of soft, swirling pastels that looked like a watercolor painting left out in the spring rain. It’s the kind of cake that makes people go quiet for a second, just to take it all in. That’s the magic we’re chasing today.
This isn’t about fussy, complicated techniques. It’s about letting your creativity run wild on a delicious, buttery base. Whether you’re a seasoned baker or someone who thinks a microwave is a cooking tool, this recipe is your ticket to a show-stopping masterpiece. It’s the ultimate centerpiece for a birthday, a baby shower, or just a Tuesday that needs a little more sparkle. Forget boring, flat cakes; we’re going for texture, depth, and a whole lot of “wow.”
Recommended Product
 -40%
-40%
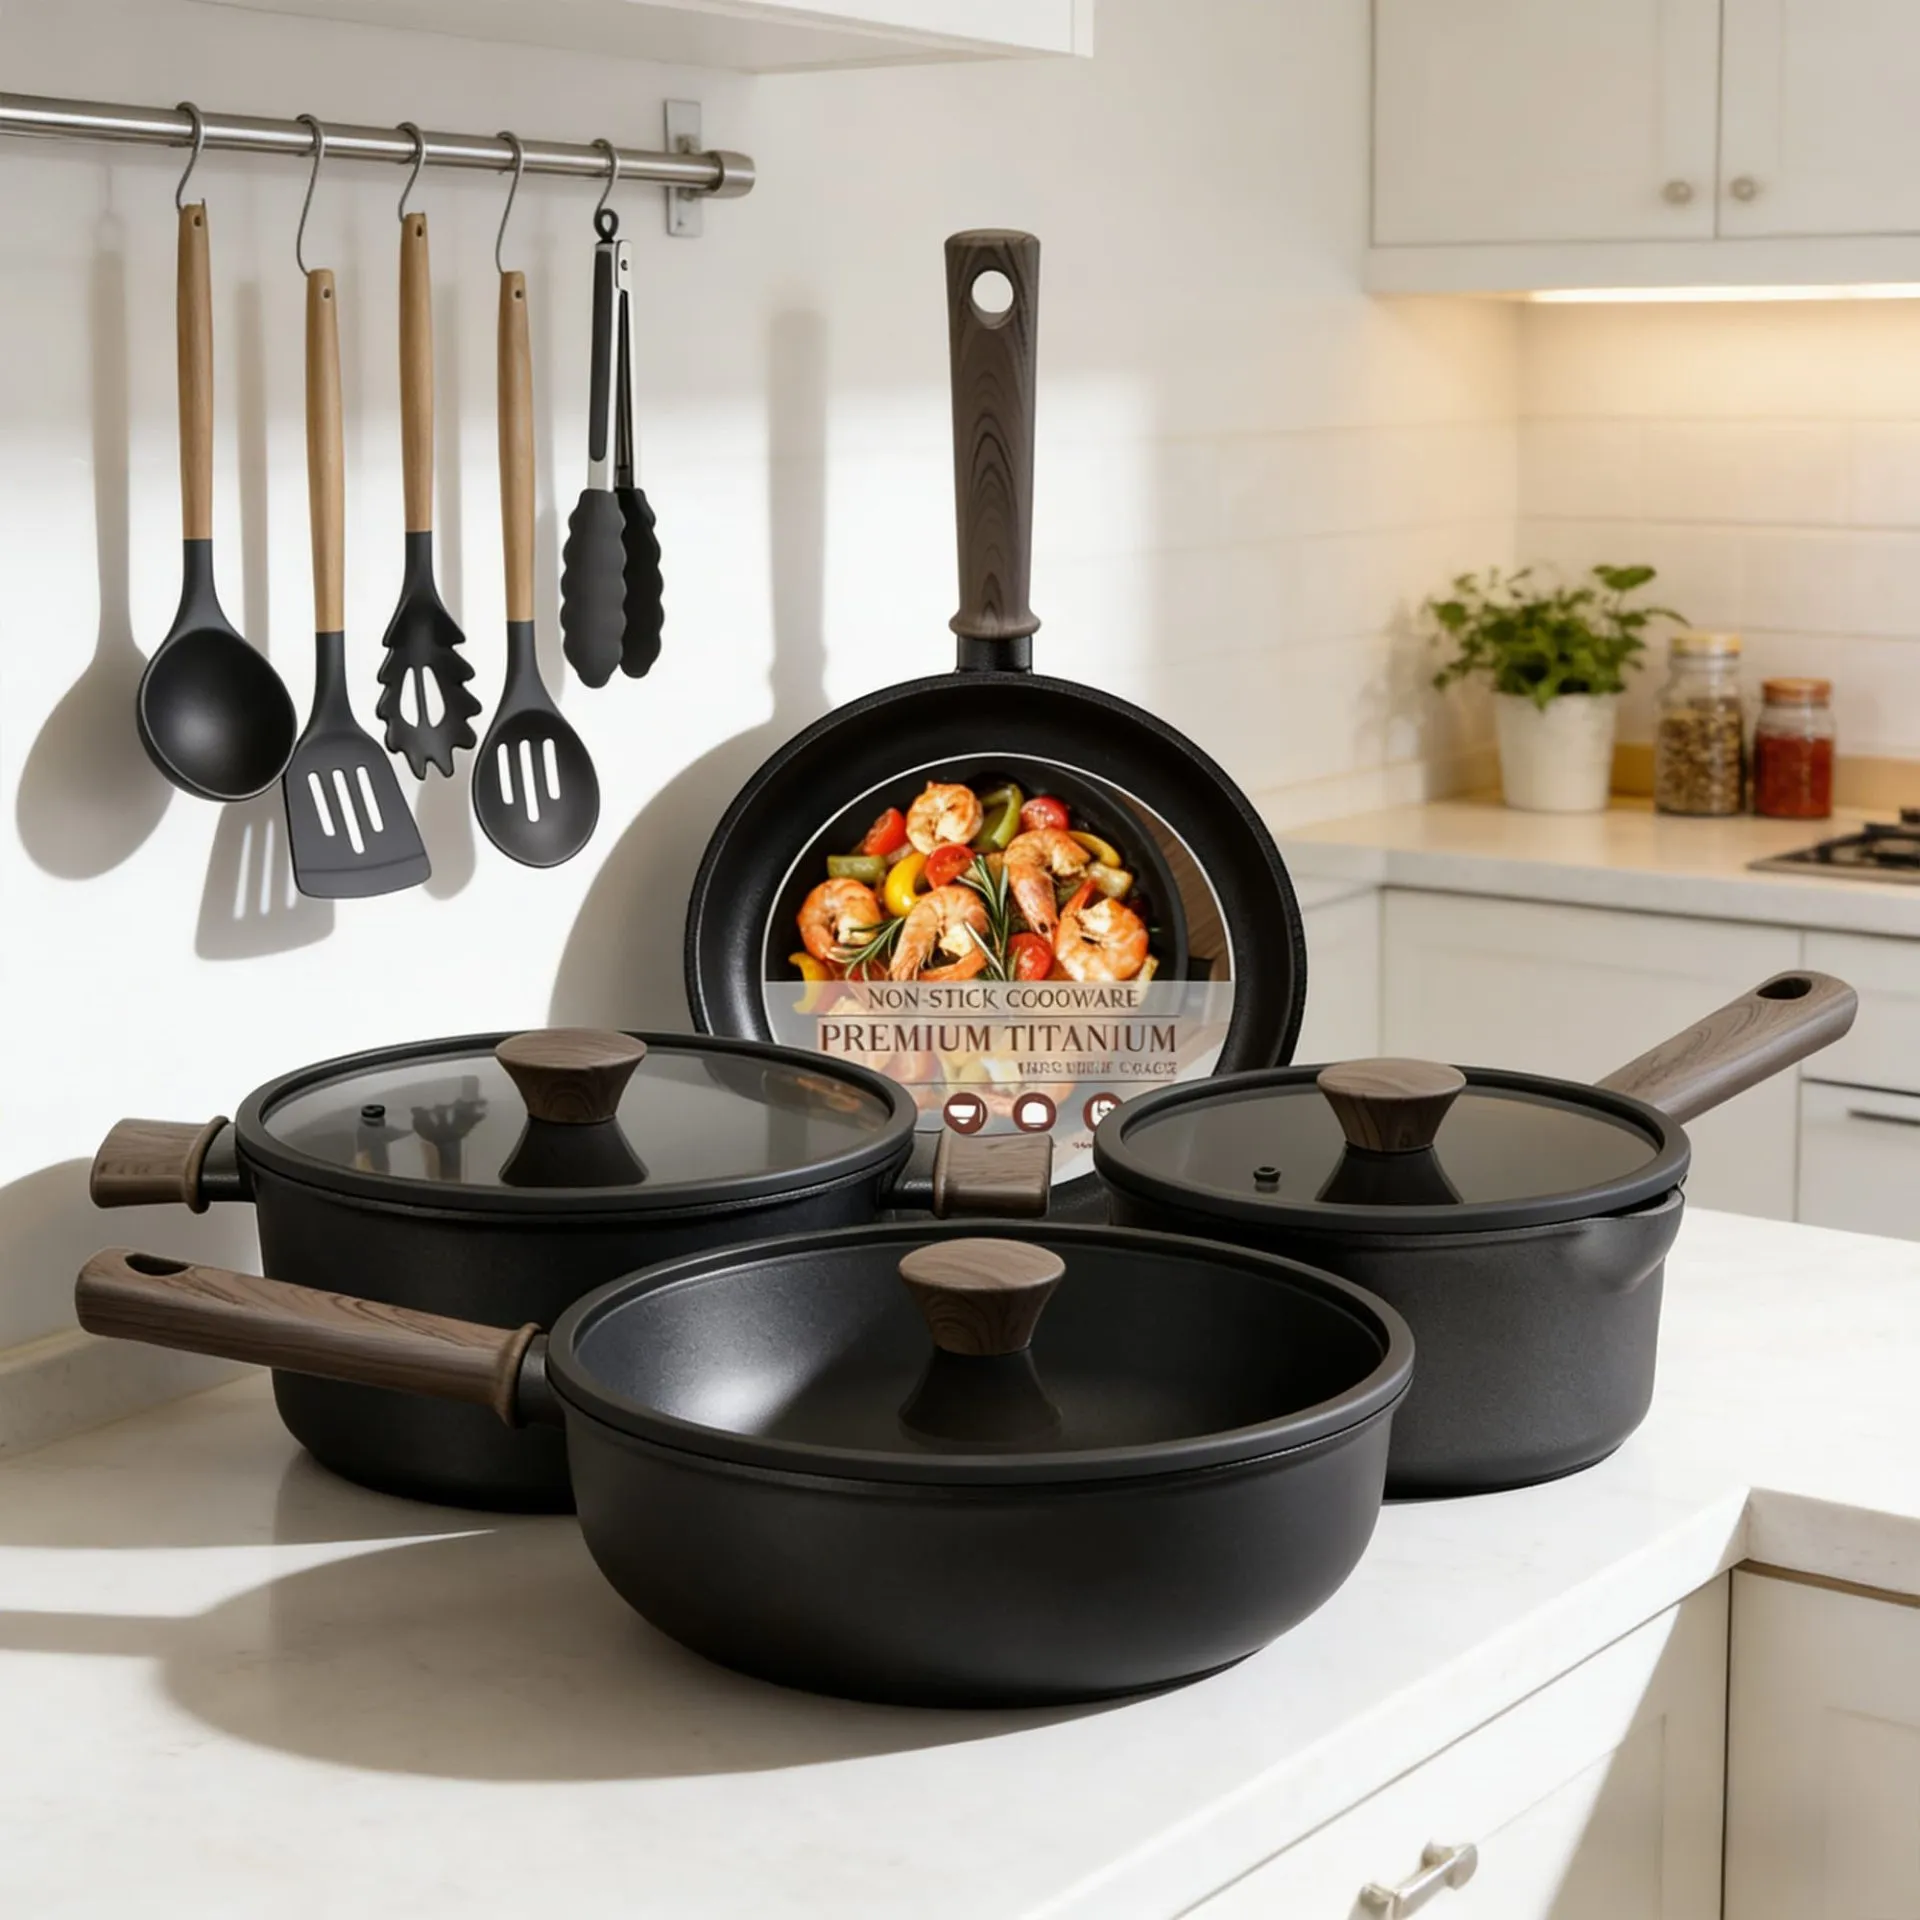
Astercook 21‑Piece Non‑Stick Ceramic Cookware Set with Detachable Handles
- Pieces →: 21‑piece set with pots, pans, lids & accessories
- Handles →: Secure removable/detachable handle system for space saving & oven use
- Non‑Stick Coating →: Premium ceramic non‑stick free of harmful PFOA chemicals for healthier cooking
- Cleanup →: Easy to clean thanks to non‑stick surface and detachable handles
What You Need to Raid the Pantry For
Gathering your ingredients is like prepping your artist’s palette. The beauty here is in the simplicity of the base and the freedom you have with the colors. You’ll need the usual suspects for a stellar vanilla cake: all-purpose flour, sugar, butter, eggs, and a good splash of vanilla extract. The real stars, however, are for the frosting. Grab your powdered sugar, more butter, and a pinch of salt to balance the sweetness.
🍳 Used in this recipe
Get It on Amazon Basics✔ Free Delivery | ✔ Top Rated | ✔ Budget-FriendlyNow for the fun part: the color. We’re using gel food coloring because it’s potent and won’t water down your buttercream. Think soft pink, buttery yellow, sky blue, and a gentle lavender. You can find these at any craft store or online. And don’t forget the tools: a couple of piping bags and a small offset spatula are your best friends here. This recipe is all about making something that looks incredibly complex, but is secretly one of the easy Watercolor Painted Cake with Soft Pastel Swirls you’ll ever tackle.
The Secret Sauce (Well, Frosting) Science
Let’s talk about the heart of this creation: the buttercream. The “watercolor” effect isn’t about painting with a brush; it’s about the science of fat and sugar. The key to that smooth, painterly finish is a perfectly smooth, crumb-coated cake. Think of the crumb coat as your primer. It seals in all the loose bits, creating a flawless, non-greasy canvas for your art. If you skip this step, your beautiful swirls will be fighting for their life against a crumbly mess.
The magic happens when you work with slightly softened, but not melted, butter. This creates an emulsion with the sugar, trapping tiny air pockets that make the frosting light and spreadable. When you layer your pastel colors and gently blend them with the spatula, you’re not just mixing; you’re creating a marbleized effect. The fat in the butter is what allows the colors to stay distinct yet seamlessly blend at the edges, just like a real watercolor painting. For more inspiration on beautiful, blended drinks and desserts, check out the category on smoothies and drinks to see how color theory works in other edible forms.
🍳 Used in this recipe
Get It on Amazon Basics✔ Free Delivery | ✔ Top Rated | ✔ Budget-FriendlyThe Step-by-Step: Let’s Get Painting
First, bake your cake layers. Let them cool completely—this is non-negotiable. A warm cake is a frosting nightmare. While they cool, whip up your vanilla buttercream. Beat the butter until it’s pale and fluffy, then gradually add the powdered sugar. The result should be a cloud-like, sweet foundation. Divide the frosting into separate bowls and tint each one with your gel colors. Remember, a little goes a long way!
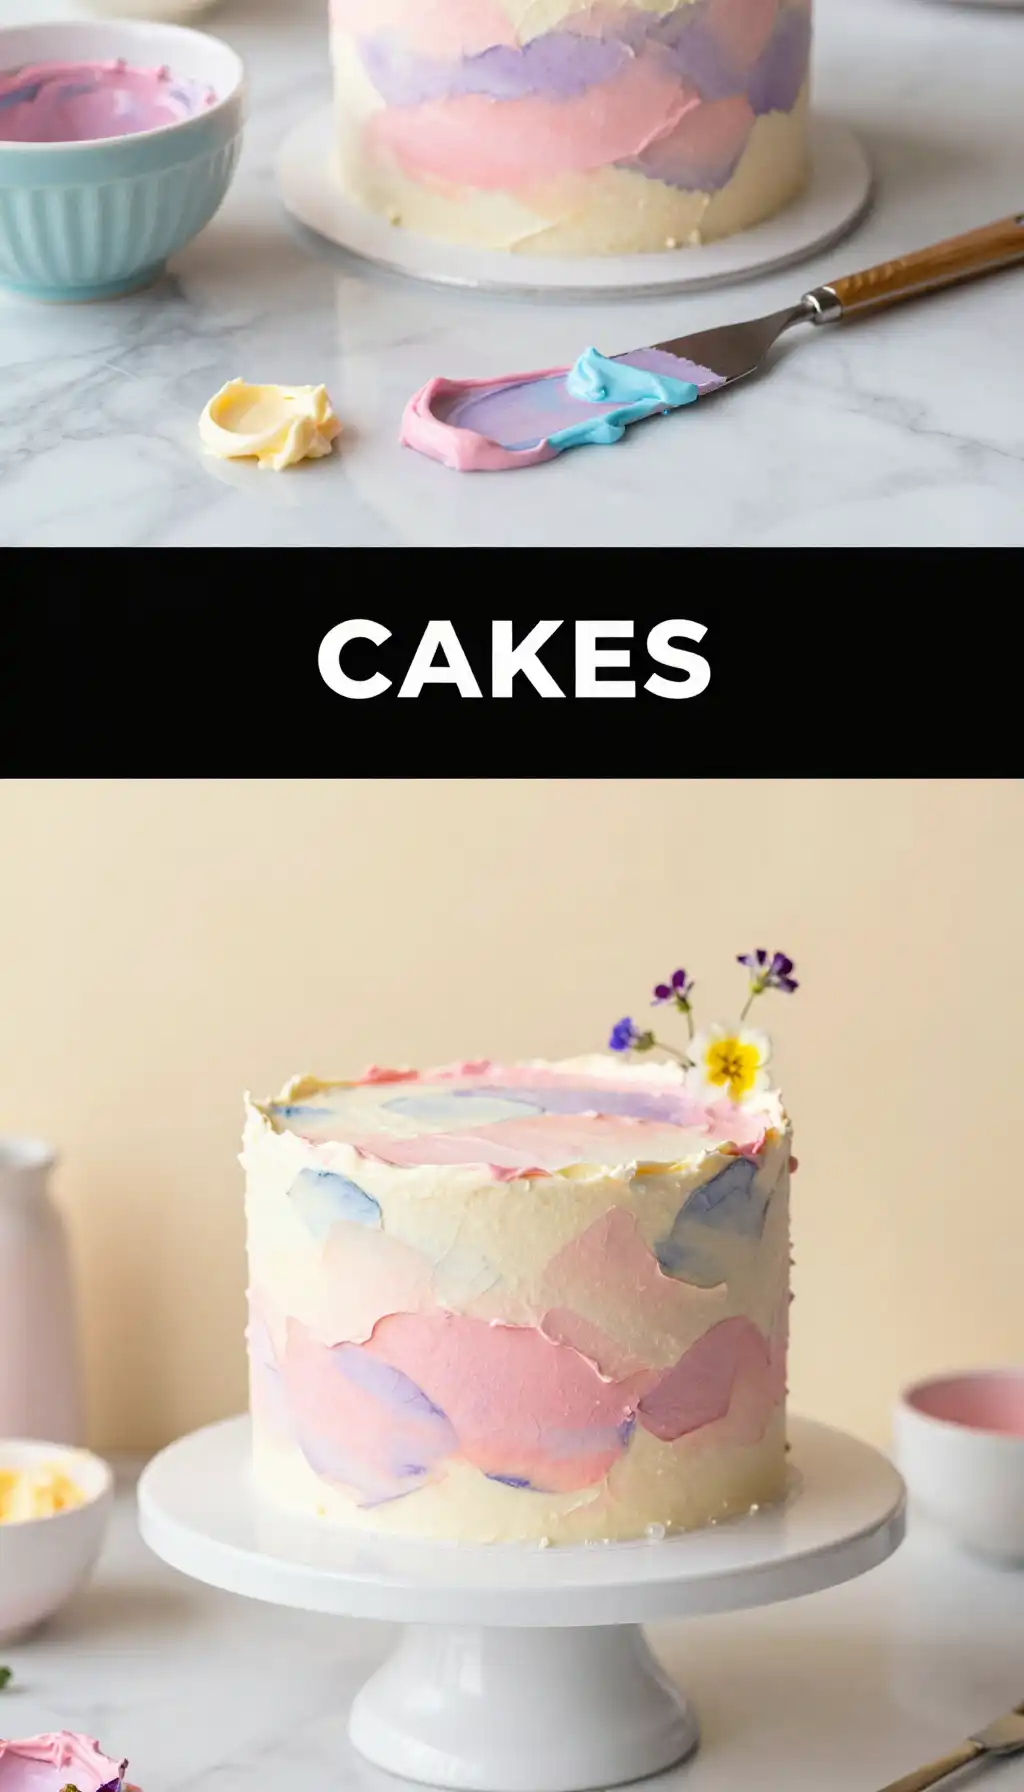
Now, the assembly. Place your first cake layer on a turntable or plate. Pipe or spread a layer of frosting. Repeat with the next layer. Once stacked, apply a thin “crumb coat” all over the cake and chill it for 20 minutes. This is your blank slate. For the final coat, you have two fun options. You can do a “paint stroke” technique by applying strips of different colored frosting side-by-side and smoothing them with your spatula. Or, for a more marbled look, pipe swirls of different colors randomly all over the chilled cake, then use your spatula in a smooth, sweeping motion to blend them into a dreamy, watercolor finish. The key is a light touch and a clean spatula.
Common Pitfalls (Or How to Avoid a Frosting Flop)
Let’s be real, baking can be a battlefield. But for this cake, the biggest villain is a warm cake. I can’t stress this enough: patience, my friend. Frosting a warm cake is like trying to paint on a melting canvas. The butter will slide right off, taking your hopes and dreams with it. Chill those layers like you mean it.
🍳 Used in this recipe
Get It on Amazon Basics✔ Free Delivery | ✔ Top Rated | ✔ Budget-FriendlyAnother sneaky trap is over-mixing the frosting after coloring. If you blend too vigorously, you’ll end up with a muddy, brownish-gray color instead of distinct pastels. Be gentle. Fold and swirl, don’t aggressively stir. And don’t be afraid of a little texture! A perfectly smooth cake is gorgeous, but a few intentional “brushstroke” marks from your spatula add to the artistic, handmade charm. Embrace the imperfections; they’re what make your cake uniquely yours.
Serving Vibes: Setting the Scene
This cake demands an audience. It’s not a quiet, Tuesday-night snack; it’s a celebration on a plate. Imagine a sunny brunch table, this masterpiece at the center, surrounded by mugs of steaming coffee and the chatter of friends. It’s the star of a bridal shower, a gender reveal, or a milestone birthday where the vibe is elegant yet joyful.
But it’s also perfect for a cozy, rainy afternoon. There’s something deeply comforting about slicing into a piece of art while the world outside is gray. Pair it with a simple, non-alcoholic sparkling elderflower drink for a touch of effervescence. The soft pastels look especially beautiful against a dark slate serving platter. Wherever you serve it, this cake is a conversation starter. It’s a gift, a centerpiece, and a memory all rolled into one delicious, soft-swirled bite.
🍳 Used in this recipe
Get It on Amazon Basics✔ Free Delivery | ✔ Top Rated | ✔ Budget-FriendlyLeftovers? Here’s the Plan
If you somehow have slices left (a testament to your willpower), storage is key. The buttercream acts as a protective seal, keeping the cake moist. For short-term storage, simply cover the cake plate with a dome or place it in a large, airtight container. It will keep beautifully at room temperature for up to two days.
For longer storage, this is one of the best cakes to freeze. Here’s how to freeze Watercolor Painted Cake with Soft Pastel Swirls: first, freeze the entire cake, uncovered, for about an hour until the frosting is firm. This prevents it from sticking to the wrap. Then, wrap it tightly in a double layer of plastic wrap, followed by a layer of aluminum foil. It will keep in the freezer for up to 3 months. To thaw, let it sit in the refrigerator overnight. Unwrap it while it’s still cold to prevent condensation from ruining the beautiful finish.
Your Watercolor Cake Questions, Answered
How do I get the colors so soft and not neon?
The secret is starting with a white base. Use a clear vanilla extract or a clear butter vanilla flavoring to keep your buttercream as white as possible. Then, add gel coloring drop by drop. You can always add more, but you can’t take it away. For pastels, think “less is more.”
🍳 Used in this recipe
Get It on Amazon Basics✔ Free Delivery | ✔ Top Rated | ✔ Budget-FriendlyCan I make this cake ahead of time?
Absolutely! In fact, it’s better if you do. You can bake the cake layers up to a day in advance, wrap them well, and store them at room temperature. Frost the cake the day you plan to serve it. The flavors actually meld and improve overnight.
What’s the calorie count for a slice of this beauty?
While it’s a showstopper, it’s also a rich treat. The calories in Watercolor Painted Cake with Soft Pastel Swirls can vary based on slice size, but a typical generous slice likely falls in the 400-550 calorie range. It’s meant to be savored, not counted with every bite!
My frosting is too soft to hold the swirls. Help!
Your kitchen might be too warm, or your butter was too soft. Pop the entire bowl of frosting into the refrigerator for 10-15 minutes. Then, give it a quick re-whip. This will firm it up just enough to hold its shape for piping and painting.
🍳 Used in this recipe
Get It on Amazon Basics✔ Free Delivery | ✔ Top Rated | ✔ Budget-FriendlyDo I need a cake turntable for this?
While a turntable makes the process infinitely easier (it’s a game-changer for smooth sides), you can absolutely do this without one. A lazy Susan from your kitchen cabinet works in a pinch, or you can just rotate your plate manually. The technique is what matters most. For more tips on creating beautiful food, you can always explore more recipes at slapid.com.

Watercolor Painted Cake with Soft Pastel Swirls
Ingredients
Ingredients
- 2.5 cups all-purpose flour sifted
- 2 tsp baking powder
- 0.5 tsp salt
- 1 cup unsalted butter softened to room temperature
- 1.75 cups granulated sugar
- 4 large eggs room temperature
- 1 tbsp vanilla extract
- 1 cup whole milk room temperature
- 3 cups powdered sugar for buttercream, sifted
- 1 cup unsalted butter softened, for buttercream
- 2 tbsp heavy cream for buttercream
- 1 tsp vanilla extract for buttercream
- gel food coloring pastel shades: pink, blue, lavender, yellow